Wednesday, December 26, 2018

New Orleans Red Beans & Rice

What's cooking in Olivia Bennett-Alexander's kitchen tonight? (Shameless Escapades plug)
 New Orleans Red beans and Rice...
This recipe ,given and taught to her by Donnie Ray's sister in Monroe ,Louisiana...is another of Donnie Ray's favorites..
"Just like our mom used to make this make this" he said. He recommended cooking the day before you want to eat it. "It is a time-consuming recipe and the taste gets even better after 24 hours in the refrigerator. For extra spice, add a splash of hot sauce."he said..

Him being from Louisiana...He ought to know..

INGREDIENTS:

1 tablespoonshortening (or as needed)
1 white onion (chopped)
3 clovesgarlic (chopped)
1 green bell pepper (chopped)
8 cupswater
1 pounddried red beans
1 smoked ham hock
1 poundsmoked sausage (cut into bite-sized pieces)
2 stalkscelery (chopped)
2 bay leaves
1 tablespooncreole seasoning (such as Tony Chachere's®)
½ teaspoondried thyme
½ teaspoondried sage
1 dashhot pepper sauce (such as Tabasco®, or to taste, optional)
3 cupswhite rice (cooked)

 DIRECTIONS:
  1. Melt shortening in a skillet over medium heat. Cook and stir onion, garlic, and bell pepper in hot shortening until tender, 5 to 7 minutes.
  2. Combine water, red beans, and ham hock in a large pot; bring to a boil. Stir onion mixture into the water; add smoked sausage and celery to the boiling water; return to a boil. Stir bay leaves, Creole seasoning, thyme, and sage into the boiling water. Reduce heat to low, place a cover on the pot, and simmer until the beans are tender, about 5 hours.
  3. Remove and discard ham hock and bay leaves; stir in hot pepper sauce and serve over white rice.

 So the verdict?

No complaints from niece Beverly
Or Husband, Nelson
 or Donnie Ray..


And if they like it...It's all good!   Good Job Olivia...


Enjoy...Eat well my friends!

Saturday, December 22, 2018

Fried Green Tomatoes

I must admit..I have never had This dish before...but I have heard from my Southern relatives...It is delish and to die for..

Green tomatoes are left on the vine to ripen in most places in America, but down South, cooks know the best thing to do with those bad boys is to deep-fry them and chow down. They’re a surprising and delightful appetizer option.

INGREDIENTS:
  • 3 Green beefsteak tomatoes
  • 3 Eggs
  • 1 Cup milk
  • 2 Cups flour
  • 4 Cups Golden Dipt all purpose batter mix
  • Vegetable Oil
  • Salt
DIRECTIONS:


For the tomatoes:
Slice off and discard the top and bottom of each tomato. Slice the tomato into 18 1/4-inch-thick slices.
Whisk together the eggs and milk to make an egg wash.
Dust the tomato slices with flour and shake off the excess.
Place the slices, a few at a time, into the egg wash.

Coat the slices with Golden Dipt.
Pour vegetable oil into a skillet to about 1 inch deep.
Heat oil on medium high heat until it sizzles when a small amount of flour is dropped in.
Fry the tomato slices in small batches until they turn golden brown and crisp.
Remove the cooked tomatoes to a plate lined with paper towels.
Season with salt and place in warm oven until all tomatoes are cooked.

ENJOY!  EAT WELL MY FRIENDS!

Monday, December 17, 2018

Apple Strudel

Here is something I've heard of, but believe it or not, Never had...So here is the recipe for it..

Add some alpine comfort to the dessert table this holiday with a classic apple strudel and a generous dollop of whipped cream or vanilla ice cream.

INGREDIENTS:
  • 6–8 apples, preferably Fuji, Red Delicious, Granny Smith, or Honeycrisp, peeled, cored, cut in half vertically, then cut into ¼-inch slices
  • 1 cup sugar
  • 4 tablespoons cinnamon
  • 4 tablespoons corn starch
  • ¼ teaspoon nutmeg
  • Zest of 1 orange
  • 1 box strudel leaves or fillo dough
  • 1 cup butter, melted
DIRECTIONS:

Toss the cut apples in a bowl with the sugar, cinnamon, corn starch, nutmeg, and orange zest. Set aside. Place a sheet of parchment paper down on a table and place the strudel leaves on top.

Layer two pieces on top of each other and brush the top piece with the melted butter. Then place two more sheets on top and brush the top with butter. Then repeat for a third time to create six layers.

Strain any accumulated juice from the apples, and spoon them in a log shape three inches in from one of the long edges.

Take the top layer of dough and fold it over the apples to secure them, then wrap the apples, and the dough, into a log.

 Brush the top and sides with more melted butter, then place in the refrigerator for one hour.

Preheat an oven to 350 degrees.

Place the strudel on a baking pan lined with parchment paper and cook for 15 minutes, or until golden brown.

Serve with cranberry ice cream and orange blossom caramel.

ENJOY!  EAT WELL MY FRIENDS!

Monday, December 10, 2018

Double Pecan Thumbpints

It's Holiday season ,so that means it's Sweet treats season too!

These buttery frangipane-filled pecan buttons are decadent without being fragile, and they make excellent cookies for boxing up and giving as gifts. Dusting them powdered sugar before baking creates a crackly, glossy coating. Feel free to add more afterward as well.

Check it out-

INGREDIENTS: 

Frangipane 
2 cups pecan halves
⅓ cup granulated sugar
1 large egg white
2 Tbsp. unsalted butter, room temperature
2 tsp. espresso powder
 ½ tsp. kosher salt
¼ tsp. almond extract Dough and Assembly
1¼ cups all-purpose flour
1 tsp. kosher salt
½ tsp. baking powder
 ¾ cup (1½ sticks) unsalted butter, room temperature
¼ cup granulated sugar
 ¾ cup powdered sugar, divided; plus more for serving (optional)
 1 large egg yolk
1 tsp. vanilla extract or paste

DIRECTIONS:

 Frangipane

Preheat oven to 350°. Lightly toast pecans on a rimmed baking sheet, tossing halfway through, until slightly darkened in color and fragrant, 6–8 minutes.

Let cool; set 1¼ cups pecans aside for making the dough.
Pulse granulated sugar and remaining ¾ cup pecans in a food processor until nuts are very finely ground (be careful to stop before they become a paste), 30–60 seconds.

Add egg white and pulse just to blend, then add butter, espresso powder, salt, and almond extract.
Pulse just until mixture is smooth and combined.
Scrape frangipane into a small bowl and chill at least 30 minutes before using.

Do Ahead: Frangipane can be made 3 days ahead. Cover and keep chilled. You will have more than you need, but try slathering leftovers on toasted brioche and baking until lightly browned (sort of like an almond croissant). We guarantee you won’t be upset about it.

Dough and Assembly Pulse flour, salt, baking powder, and 1 cup reserved pecans in clean food processor until nuts are very finely ground, about 1 minute.

Beat butter, granulated sugar, and ¼ cup powdered sugar in the bowl of a stand mixer fitted with paddle attachment on medium-high speed until light and fluffy, about 4 minutes. Add egg yolk and vanilla and beat until combined and no streaks remain. Reduce speed to low and add dry ingredients. Beat just until incorporated, about 1 minute. Cover bowl with plastic wrap and chill dough until it’s firm enough that you can scoop it and it will hold its shape, 30–45 minutes.

Place racks in upper and lower thirds of oven; preheat to 350°. Place ½ cup powdered sugar in a shallow bowl. Working in batches, scoop out tablespoonfuls of dough and roll into balls between your hands, then roll in powdered sugar, knocking off any excess. Transfer to 2 parchment-lined baking sheets as you work, spacing 2" apart.

Bake cookies until puffed but edges are still soft, 6–8 minutes. Carefully remove from oven and make an indent in the center of each cookie with the handle end of a wooden spoon or a similar heatproof object. Spoon a heaping ½-teaspoonful of frangipane into each and top with a pecan half from remaining reserved ¼ cup. Return cookies to oven and continue to bake until edges are set and very lightly browned, 6–8 minutes longer. Let cool on baking sheets.

 Just before serving, dust cookies with more powdered sugar if desired.

Do Ahead: Cookies can be baked 5 days ahead. Store airtight at room temperature.

Enjoy!  Eat Well My friends!

Friday, December 7, 2018

Sweet Potato Pie With Marshmellow Meringue

Hey babies....Here is a savory pie for the fall that isn't Pumpkin...Sweet Potato Pie with Marshmellow Meringue.

Sweet potatoes are essentially the closest you’ll get to pumpkin in both taste and consistency. With ingredients and spices similar to that of a pumpkin pie, it’s the perfect alternative to the fall classic. Factor in the rich and fluffy marshmallow meringue, and you have an utterly delectable treat in your hands..

So check this out-

INGREDIENTS:


1 cupall-purpose flour (sifted)
½ teaspoonsalt
⅓ cupshortening (+1 Tablespoon)
2 tablespoonsice cold water
3 large sweet potatoes (to make 2 cups of filling, do not use canned)
4 egg yolks (from large eggs)
¾ cupsugar
¼ cupbrown sugar (lightly packed)
¼ cupevaporated milk
1 tablespoonfresh lemon juice
1 teaspoonvanilla extract
1 teaspoonground cinnamon
½ teaspoonkosher salt
¼ teaspoonground nutmeg
1 lemon (zest of)
6 egg whites (room temperature)
3 ½ cups marshmallow creme

DIRECTIONS:
For the pie crust, measure flour into bowl; mix salt through it. With pastry blender (or two knives) cut in shortening until particles are the size of giant peas. Sprinkle with cold water, a Tablespoon at a time, mixing lightly with fork, until all flour is moistened.
Here is my trick. No matter what crust I use, it never seems to roll out as large as I want, so I increase the recipe by about half (it doesn’t even need to be exact). This gives me extra dough on the edges for a thicker crust and I often have enough left over to make little cut outs as well. This crust recipe is for an 8″ or 9″ pie, but with the increase, it fits my 9″ deep dish pan, which is what I used to make this pie. It’s up to you whether you increase the recipe for the dough or not.

 Gather dough together with fingers so it cleans the bowl. Press firmly into a ball. Then turn out lightly on a board covered with wax paper and lightly floured to prevent sticking.

 Prepare your rolling pin by covering it with a stockinet. If you do not have a stockinet, you must get one. It will make your crust endeavors so much easier. Flatten the disc with your hand and roll out the dough to about 1/8″ thick. Keep rounding the pastry edge. If it begins to break, pinch broken edges together the best you can. Keep pastry circular and roll it about 1″ larger all around than an inverted pie pan.

 Fold pastry in half and carefully transfer to your pie pan. Unfold and ease pastry loosely into pan. Do not stretch which causes shrinking during baking.

Fold the edges under and crimp as desired. Preheat oven to 400 degrees.
Place pie shell in the freezer for 15 minutes or until firm. Line frozen shell with foil, pressing firmly against the sides and folding gently over the edges. Fill shell with raw rice or dried beans and blind bake until crust is set but not browned, about 20 minutes. Unfold foil at edges and carefully lift it out; return shell to oven and bake 5-10 minutes, or until pale golden.

 For the filling, bake sweet potatoes for 40-50 minutes or until very soft in a 400 degree oven. Peel while hot and place potatoes in food processor.

 Puree until smooth. Peeling and processing the potatoes while hot makes a smoother puree.

 Add egg yolks, sugars, milk, lemon juice, vanilla, spices and lemon zest; whisk just to blend. Pour filling into pie crust (it’s alright if the crust is still hot from baking…if you are using a store bought crust, make sure it’s at least room temperature), smooth the top and bake 20 minutes at 400 degrees. Reduce oven to 325 degrees and continue baking until a knife inserted 1″ from the center comes out clean, 20-30 minutes. Remove pie but leave oven on.

 Beat room temperature egg whites (you can do this and have it ready while pie is baking) with a mixer in a clean metal or glass bowl until soft peaks form. Gradually add marshmallow creme and continue beating until stiff peaks form, 5-7 minutes more.

 Spread meringue over pie all the way to edges so the meringue doesn’t shrink. (Beads of liquid often form on meringue. To avoid “weeping” spread the meringue on the pie while the filling is hot, then brown it.) Spike it to make swirls and swoops. Return pie to the oven and bake 15-20 minutes or until topping is golden, rotating for even browning. Watch the pie carefully at this point, do not walk away…meringue can burn.


Cool pie to room temperature and place in the fridge over night before serving.

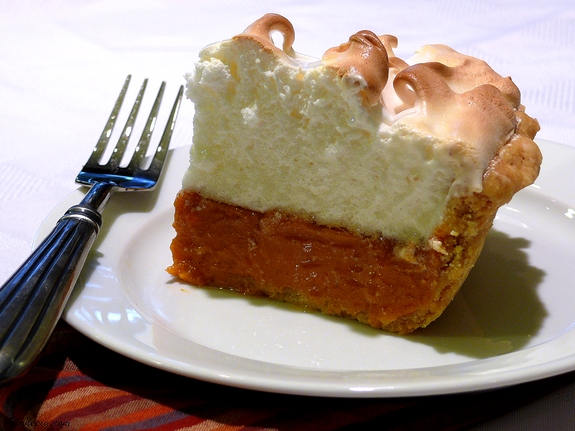
 And there you have it...Enjoy!  Eat well my friends!

Thursday, November 29, 2018

Honey Wings

It's time to get serious about Honey Barbecue Wings....Here is the real deal about how to prepare em...Check it out..

INGREDIENTS:
  • 18 chicken wings
  • 1 teaspoon kosher salt
  • 1 teaspoon garlic powder
  • 12 teaspoon sugar
  • 12 teaspoon paprika
  • 12 teaspoon black pepper
  • 14 teaspoon cayenne
  •  Cooking spray
  • SAUCE
  • 1 cup barbecue sauce, preferably Hickory Smoke Flavor
  • 12 cup honey
  • 2 tablespoons ketchup
  • 2 tablespoons hot sauce
  • 4 tablespoons butter
  • 12 teaspoon garlic powder
DIRECTIONS:

  1. Wash, dry, and season the wings with the salt, garlic, pepper, cayenne, sugar, and paprika. Preheat the oven to 375.
  2. Spray a cookie sheet with a generous spray of cooking spray.
  3. Place the wings in a single layer on the cookie sheet, and place in the oven.
  4. Cook for 35-40 minutes, depending on the size of the wings, turning once.
  5. While they are baking, make the sauce by slowly simmering the sauce ingredients over the lowest heat.
  6. When the wings are done baking, carefully dip them in the sauce, and place them back in the oven for another 5 minutes, or until the sauce is bubbling.
  7. ENJOY! Eat well My friends!

Saturday, November 10, 2018

Spicy Beef & Pepper Stir-Fry


In a mood for Chinese or Pan Asian? Here is a great start...


INGREDIENTS:
  • 1 pound beef top sirloin steak, cut into thin strips
  • 1 tablespoon minced fresh gingerroot
  • 3 garlic cloves, minced, divided
  • 1/4 teaspoon pepper
  • 3/4 teaspoon salt, divided
  • 1 cup light coconut milk
  • 2 tablespoons sugar
  • 1 tablespoon Sriracha Asian hot chili sauce
  • 1/2 teaspoon grated lime zest
  • 2 tablespoons lime juice
  • 2 tablespoons canola oil, divided
  • 1 large sweet red pepper, cut into thin strips
  • 1/2 medium red onion, thinly sliced
  • 1 jalapeno pepper, seeded and thinly sliced
  • 4 cups fresh baby spinach
  • 2 green onions, thinly sliced
  • 2 tablespoons chopped fresh cilantro
DIRECTIONS:
  • In a large bowl, toss beef with ginger, 2 garlic cloves, pepper and 1/2 teaspoon salt; let stand 15 minutes. In a small bowl, whisk coconut milk, sugar, chili sauce, lime zest, lime juice and remaining salt until blended.
  • In a large skillet, heat 1 tablespoon oil over medium-high heat. Add beef; stir-fry 2-3 minutes or until no longer pink. Remove from pan.
  • Stir-fry red pepper, red onion, jalapeno and remaining garlic in remaining oil 2-3 minutes or just until vegetables are crisp-tender. Stir in coconut milk mixture; heat through. Add spinach and beef; cook until spinach is wilted and beef is heated through, stirring occasionally. Sprinkle with green onions and cilantro.
Enjoy! Eat Well My friends!

Thursday, November 1, 2018

Country Bacon Beef Mac & Cheese

The Ultimate in Slow Cooker Comfort Food is this dish right here...Meaty slow cooker mac and cheese is easy to make, very tasty and the kids will love it!

Check it Out!

INGREDIENTS:
  • 5 bacon strips, chopped
  • 1-1/2 pounds ground beef
  • 1 medium onion, chopped
  • 3 garlic cloves, minced
  • 1 medium sweet red pepper, chopped
  • 1 large carrot, coarsely grated
  • 1 tablespoon dried parsley flakes
  • 1/4 teaspoon salt
  • 1 teaspoon pepper
  • 3 cups uncooked protein plus or whole wheat elbow macaroni
  • 1 can (14-1/2 ounces) reduced-sodium beef broth
  • 1 cup sour cream
  • 2 cups shredded sharp cheddar cheese
  • 2 cups shredded part-skim mozzarella cheese
DIRECTIONS:
  • In a large skillet, cook bacon, stirring occasionally, over medium heat until crisp, 5-6 minutes. Remove with a slotted spoon; drain on paper towels. Discard all but 1 tablespoon of drippings. Brown ground beef in drippings; remove from pan. Add onion to skillet; cook and stir until translucent, 2-3 minutes. Add garlic; cook 1 minute more.
  • Combine red pepper, carrot, seasonings and pasta in a 4-qt. slow cooker. Layer with ground beef, bacon and onion mixture (do not stir). Pour in broth.
  • Cook, covered, on low until meat and vegetables are tender, about 1 hour. Thirty minutes before serving, stir in sour cream and cheeses.
ENJOY! EAT WELL MY FRIENDS!

Tuesday, October 23, 2018

Mashed Potatoes

Mashed potatoes are always a crowd pleaser at the Thanksgiving table or at any table for that mater (Except when they're not.)

So knowing how to make them the right way is kind of essential. And while they seem easy enough to whip up on the fly, there are a few trick you can employ to ensure your mash is fluffy and light instead of gloppy and gloopy.

 Here's how to master mashed potatoes:

1. Choose the right potato(es)

Starchy potatoes like Russets are the classic and best choice for mashed potatoes. Their high starch content guarantees a light, fluffy result that easily soaks up butter and cream. Using low-starch, waxy potatoes such as fingerlings or red-skinned potatoes will result in a mash that's gummy.
However, while Russets make for a fluffy mash, they do tend to be milder in flavor than some other varieties. Combining Russets with a flavorful potato, such as Yukon Golds (which are lower in starch than Russets, but totally big on flavor) makes for a richer, more buttery-tasting mash.

2. Cut the potatoes evenly

For classic Thanksgiving potatoes, you'll want to peel them first. Start by peeling one potato, cutting it into large, even chunks and placing the chunks directly into a bowl of cold water. Then continue with the next potato. Placing potatoes directly into the water will keep them from browning and rinse off some excess starch.

3. Boil potatoes starting with cold water

Drain the chopped potatoes and then transfer to a large pot and cover them with fresh cold water. Bringing your potatoes to a boil with the water rather than adding them to already boiling water will ensure they cook evenly—this is also why you want evenly chopped potatoes: so that a small chunk doesn't overcook while you're waiting for a larger one to be done.
Potatoes are pretty much a blank slate when it comes to flavor, so it's important to season as you go. Generously salt the water you use to boil your potatoes. "I also like boiling the potatoes with whole peeled garlic," says former Epi editor Adina Steiman. The garlic infuses into the potatoes as they cook, adding a subtle savory flavor.

Rice the potatoes

"A potato ricer is the best way to make mashed potatoes," says senior food editor Anna Stockwell: it's the best way to limits lumps, prevents you from overworking the potatoes, and makes things go along more quickly than using other methods. Want mashed potatoes that are fluffy rather than gluey? Put the potato masher aside and reach for a ricer instead.


Thanksgiving isn't the right time to put a hold on fat. Reach for high-quality unsalted butter (so you can control the salt yourself), whole milk, and real cream for the ultimate mash. Let the butter soften to room temperature—if you melt it, you'll loose the emulsion resulting in potatoes that are less creamy.
However, for maximum absorption—and so you don't cool down the potatoes too quickly—you'll want to heat up the milk and cream. Don't bring it to a boil, just heat it until it's hot to the touch or you start to see steam rising from the pot. Feel free to toss in a few fresh thyme sprigs, garlic cloves, or bay leaves to infuse the milk while it warms up—just be sure to leave them behind in the pot when you pour the milk into the potatoes. If you want to add tang, swap out some of the milk for buttermilk, sour cream, or full-fat Greek yogurt. Since they'll curdle when heated, these can be added cold.

6. Reheat the right way

Yes, you can make mashed potatoes ahead of time. The challenge is reheating them while keeping them luscious. Potatoes continue to absorb moisture as they sit, so former food editor Katherine Sacks recommends keeping some of the milk you're putting in the mash to the side to use when you reheat it. "Make the mashed potatoes a bit drier then you want them to be. When you're ready to reheat them, simmer the remaining milk in a pot, stir in the mash, cover and warm over low heat."

 ENJOY!  EAT WELL MY FRIENDS!

Friday, October 5, 2018

Beef Stroganoff With Buttered Noodles

This tasty dish originated in Russia of all places.....

INGREDIENTS:

3 cups beef stock
1 carrot, chopped
6 sprigs fresh thyme
1 bay leaf
2 pounds chuck roast, cut into 2-inch cubes
Kosher salt and freshly ground black pepper
6 tablespoons extra-virgin olive oil
1 medium onion, chopped
2 tablespoons cognac
5 tablespoons unsalted butter
1 pound mushrooms, sliced
3 cloves garlic, chopped
2 tablespoons sour cream, plus more for garnish
1 tablespoon Dijon mustard
2 tablespoons chopped fresh parsley leaves, plus more for garnish
1 (1-pound) package wide egg noodles
DIRECTIONS: 
  1. Heat the beef stock with the carrot, 3 thyme sprigs, and bay leaf. Pat the beef dry and season it with salt and pepper. Heat 3 tablespoons oil in a large heavy bottomed skillet over high heat. Fry the meat in batches so that it is browned on all sides. Lower the heat to medium and return all the meat to the pot. Add the onions and cook until they are soft, about 5 minutes. Pour in the cognac and cook until the alcohol has burned off, about 5 minutes. Add the beef stock, discarding the carrot, thyme sprigs, and bay leaf. Cook, partially covered, over a very low flame for 1 1/2 to 2 hours.
  2. In a large skillet over medium heat, melt 3 tablespoons butter in the remaining 3 tablespoons olive oil. Add the mushrooms, garlic, and remaining 3 thyme sprigs and cook until the mushrooms are browned and cooked through. Remove from heat and set aside.
  3. When the meat is done, remove it from the heat and fold in the mushrooms, sour cream, mustard, and parsley. Taste and adjust the seasoning with salt and pepper.
  4. Meanwhile, cook the noodles in a large pot of boiling, salted water until tender. Drain the noodles well, toss with the remaining 2 tablespoons butter, and season with salt and pepper. Serve the stroganoff over the noodles; garnish with more sour cream and chopped parsley.
Ummmmm, Enjoy! Eat Well My Friends!

Wednesday, October 3, 2018

Crock Pot Chicken DrumSticks

See These drumsticks? These Drumsticks are the perfect game-day treat. They're super tender and packed with flavor. Broiling is an optional step, but it really takes them to a whole other level. Fall apart meat and crispy skin.

INGREDIENTS: 

1/2 c. low-sodium soy sauce

1/2 c. low-sodium chicken broth

1/4 c. sweet Thai chili sauce

2 tbsp. Sriracha

2 tbsp. brown sugar

Juice of 1 lime

 1" fresh ginger, peeled and minced

3 cloves garlic, crushed

4 to 4 1/2 lb. chicken drumsticks

2 green onions, thinly sliced

1 tsp. toasted sesame seeds, for garnish

DIRECTIONS:

In a large bowl, whisk together soy sauce, chicken broth, chili sauce, Sriracha, brown sugar, and lime juice. Stir in ginger and garlic.

Place drumsticks in a large resealable back. Pour over marinade and seal. Marinate 30 minutes up to overnight.

Pour drumsticks and marinade into slow cooker and cook on high for 3 to 4 hours or low for 5 or 6.

 When drumsticks are tender and cooked through, preheat broiler to high.

Transfer drumsticks to a large foil-lined baking sheet and broil until golden and crisp, 3 to 5 minutes.

 Garnish with green onions and sesame seeds and serve hot.

And there you have it!

Enjoy!  Eat Well My Friends!

Tuesday, October 2, 2018

Stuffed Rigatoni


You know I'm a lover of pasta....And this is an insanely easy recipe for a week day night...So I'm told...You know I'm always looking out for the fatigued working man and woman...Should I add fatigued, stressed out and hungry working man and woman...

INGREDIENTS:

3/4 lb. rigatoni
Kosher salt
1 (16-oz.) container ricotta
1/2 (10-oz.) box frozen spinach, thawed, wrung out, and chopped
2 cloves garlic, minced
1 egg
1/2 c. grated Parmesan, plus more for sprinkling
Crushed red pepper flakes
Zest of 1 lemon
1 (32-oz.) jar marinara
1 1/2 c. shredded mozzarella

DIRECTIONS:

  1. Preheat oven to 350°. Grease a large rimmed baking sheet with cooking spray or oil. In a large pot of boiling salted water, cook rigatoni according to package instructions until al dente.
  2. Drain, then scatter on prepared baking sheet.
  3. In a large bowl, mix together ricotta, spinach, Parmesan, garlic, and lemon zest. Season with salt and a big pinch of red pepper flakes. Transfer mixture to a piping bag or a large resealable plastic bag and snip one corner. 
  4. Spread a layer of sauce into bottom or large skillet or medium baking dish. Fill each rigatoni with ricotta mixture then place on top of sauce in concentric circles in an even layer. Top with more sauce and mozzarella. Place another layer of filled rigatoni on top then spread more sauce on top. Sprinkle with Parmesan. Bake until top is crispy and sauce is bubbling, about 30 minutes.
Serve with a nice Red Wine!

What do you think? Easy huh? Enjoy! Eat well my friends.

Thursday, September 27, 2018

Sheet Pan Pork Chops


A nice quick and easily prepared meal for weeks nights when you come home mentally and physically exhausted ,like I am as I write this.

These pork chops also stand up great to high heat and assertive flavors, so they’re a natural pairing with hearty root vegetables and a bold vinaigrette.
Be sure to use pork chops that measure between 1 and 1 1/2 inches thick for this recipe.

(From Dinner Illustrated)

INGREDIENTS:

  • 1 pound Yukon Gold potatoes
  • 1 pound carrots
  • 1 fennel bulb
  • 10 garlic cloves
  • 1/3 cup extra-virgin olive oil
  • 1/2 teaspoon dried rosemary
  • 1 teaspoon paprika
  • 1 teaspoon ground coriander
  • 4 (12-ounce) bone-in center-cut pork chops, 1 to 1 ½ inches thick
  • 1 small shallot
  • 1 handful fresh parsley
  • 4 teaspoons red wine vinegar
  • 1/8 teaspoon sugar
DIRECTIONS:
  1. Prep Vegetables and Aromatics: Adjust oven rack to upper-middle position and heat oven to 450°F. Cut potatoes in half lengthwise, then cut crosswise into 1/2-inch-thick slices. Peel carrots and cut into 3-inch lengths, quartering thick ends lengthwise. Discard fennel stalks, halve bulb, and cut into 1/2-inch-thick wedges. Peel garlic.
  2. Roast Vegetables: Toss 1 tablespoon oil, rosemary, potatoes, carrots, fennel, garlic, 3/4 teaspoon salt, and ¼ teaspoon pepper together in a bowl. Spread vegetables in single layer on rimmed baking sheet. Roast until beginning to soften, about 25 minutes.
  3. Prep Pork: While vegetables roast, combine paprika, coriander, 1 teaspoon salt, and 1 teaspoon pepper in a bowl. Trim pork and pat dry with paper towels. Cut 2 slits, about 2 inches apart, through fat on edges of each chop. Rub chops with 1 teaspoon oil, then season thoroughly with spice mixture.
  4. Roast Pork: Lay chops on top of vegetables and continue to roast until chops register 145°F and vegetables are tender, 10 to 15 minutes, rotating sheet halfway through roasting.
  5. Make Vinaigrette: While pork cooks, mince shallot. Mince 2 tablespoons parsley. Whisk vinegar, sugar, remaining ¼ cup oil, shallot parsley, 1/4 teaspoon salt, and 1/4 teaspoon pepper together in a bowl.
  6. Finish Dish: When pork is cooked, remove sheet from oven, tent with aluminum foil, and let rest for 5 to 10 minutes. Drizzle vinaigrette over pork and serve.
Easy enough? Okay! Enjoy! Eat and Drink Well My Friends!

Friday, September 21, 2018

Fettucine Bolognese Made Easy

I always order this when I go to the California Pizza Kitchen...(Shameless plug...I kinow) but here is the crib notes version to how to prepare this..-

INGREDIENTS:
  • One 9 oz package  Fettuccine
  • Two 10-ounce containers  Meat  Sauce
  • Grated Parmigiano Reggiano cheese to taste
DIRECTIONS:
 Cook Fettuccine in salted boiling water for 1 minute, then drain. Heat Meat Lovers Sauce in saucepan and then add Fettuccine. Add pasta-cooking water a little at a time, if necessary. Top with grated Parmigiano Reggiano cheese and serve.


That's it....Piece of cake......Enjoy it tonight!   Eat Well My Friends!

Thursday, September 20, 2018

One Pan Ranch Pork Chops

This photo makes me want to make this tonight....Unfortunately for me, I can't...but with this recipe ,you can...

I promise you This promises to be the easiest 5-ingredient meal EVER! And yes, you just need one pan with 5 min prep. It’s quick, easy and effortless!  Check it out!

INGREDIENTS:
  • 4 (8-ounce) pork chops, bone-in, 3/4-inch to 1-inch thick
  • 16 ounces baby red potatoes, halved
  • 16 ounces green beans, trimmed
  • 2 tablespoons olive oil
  • 1 (1-ounce) package Ranch Seasoning and Salad Dressing Mix
  • 3 cloves garlic, minced
  • Kosher salt and freshly ground black pepper, to taste
  • 2 tablespoons chopped fresh parsley leaves
DIRECTIONS: 
  1. Preheat oven to 400 degrees F. Lightly oil a baking sheet or coat with nonstick spray.
  2. Place pork chops, potatoes and green beans in a single layer onto the prepared baking sheet. Drizzle with olive oil and sprinkle with Ranch Seasoning and garlic; season with salt and pepper, to taste.
  3. Place into oven and roast until the pork is completely cooked through, reaching an internal temperature of 140 degrees F, about 20-22 minutes.* Then broil for 2-3 minutes, or until caramelized and slightly charred.
  4. Serve immediately, garnished with parsley, if desired.
There now wasn't that easy? Get to the supermarket and pick up the ingredients and fire up that stove...Enjoy! Eat well my friends!

Sunday, September 16, 2018

Dixie Lamb Chops


Next to Beef, I love Lamb and if you want to cook something different for dinner...Here it is..Dixie Lamb Chops...Check Out this easy recipe-

INGREDIENTS:
  • 4 lamb loin chops (5 to 6 ounces each)
  • 1/2 teaspoon salt
  • 1/4 teaspoon pepper
  • 1 tablespoon olive oil
  • 1/4 cup molasses
  • 2 tablespoons steak sauce
  • 1 tablespoon cider vinegar
DIRECTIONS:
  • Sprinkle chops with salt and pepper. In a large skillet, heat oil over medium heat; cook chops, covered, until bottoms are browned, 5-7 minutes.
  • Mix molasses, steak sauce and vinegar. Turn chops; pour molasses mixture over top. Cook, covered, over medium-low heat until lamb reaches desired doneness (for medium-rare, a thermometer should read 135°; medium, 140°), 5-7 minutes.
Piece of cake.Serve these with Cream Spinach and a Hearty Bread...

Enjoy!  Eat well my friends!

Saturday, September 15, 2018

Pumpkin Patch Pie

Fall Starts in about a week and in that season, Pumpkin Pie is always a favorite....Not Sweet Potato, We'll deal with that later..but Pumpkin Pie...

INGREDIENTS:
  • 1 medium pie pumpkin (about 3 pounds)
  • 2/3 cup sugar, divided
  • 1-1/2 teaspoons ground cinnamon, divided
  • 1/8 teaspoon salt
  • 1/2 teaspoon ground ginger
  • 1/2 teaspoon ground nutmeg
  • 3 large Nellie’s Free Range Eggs, lightly beaten
  • 1 can (5 ounces) evaporated milk
  • 1/2 cup milk
  • Pastry for single-crust pie (9 inches)
  • Whipped cream and ground cinnamon, optional
DIRECTIONS:
  • Wash pumpkin; cut a 6-in. circle around stem. Remove top and set aside. Remove loose fibers and seeds from the inside and discard or save seeds for toasting. In a small bowl, combine 1/3 cup sugar, 1/2 teaspoon cinnamon and salt; sprinkle around inside of pumpkin.
  • Replace the top. Place in a greased 15x10x1-in. baking pan. Bake at 325° for 1-1/2 hours or until very tender. Cool.
  • Scoop out pumpkin; puree in a blender until smooth. Place 2 cups pureed pumpkin in a large bowl. Add the ginger, nutmeg and the remaining sugar and cinnamon. Stir in the eggs, evaporated milk and milk.
  • Line a 9-in. pie plate with pastry; trim pastry to 1/2 in. beyond edge of plate. Flute edges; pour filling into crust.
  • Cover edges with foil. Bake at 375° for 75-80 minutes or until a knife inserted in the center comes out clean. Cool on a wire rack. If desired, top with whipped cream and cinnamon before serving.
And there you have it... Enjoy! Eat and Drink Well My Friends!

Friday, September 14, 2018

Tenderloin Steak Diane

I don't know why they call it this...I don't know what Diane had to do with this and I don't know Diane....All I know is this looks good and I have a recipe for you that shows you how to fix this...

INGREDIENTS:
  • 4 beef tenderloin steaks (6 ounces each)
  • 1 teaspoon steak seasoning
  • 2 tablespoons butter
  • 1 cup sliced fresh mushrooms
  • 1/2 cup reduced-sodium beef broth
  • 1/4 cup heavy whipping cream
  • 1 tablespoon steak sauce
  • 1 teaspoon garlic salt with parsley
  • 1 teaspoon minced chives
DIRECTIONS:
  • Sprinkle steaks with steak seasoning. In a large skillet, heat butter over medium heat. Add steaks; cook 4-5 minutes on each side or until meat reaches desired doneness. Remove steaks from pan.
  • Add mushrooms to skillet; cook and stir over medium-high heat until tender. Add broth, stirring to loosen browned bits from pan. Stir in cream, steak sauce and garlic salt. Bring to a boil; cook and stir 1-2 minutes or until sauce is slightly thickened.
  • Return steaks to pan; turn to coat and heat through. Stir in chives.
DON'T SWEAT THE TECHNIQUE- 

This recipe was tested with McCormick’s Montreal Steak Seasoning. Look for it in the spice aisle.
Nutrition Facts
1 steak with 2 tablespoons sauce: 358 calories, 21g fat (11g saturated fat), 111mg cholesterol, 567mg sodium, 2g carbohydrate (1g sugars, 0 fiber), 37g protein. 
There...You have it....And Diane...Whoever you are....Thank You!
A confirmed Steak Lover!

Tuesday, September 4, 2018

BLT Tacos

Why BLT Tacos? Because everyone deserves bacon on their first day back at work.

 Everyone knows that bacon, lettuce and tomato is one of the greatest sandwich combinations ever. Here, I will take that trifecta and roll it up into taco form...Check it out-

INGREDIENTS:

4 servings
1 pound thickly sliced bacon
1½ teaspoons freshly ground black pepper
12 tortillas
6 leaves Boston lettuce, torn in half
2 tomatoes, thickly sliced
1 avocado, thickly sliced
Lime slices, as needed for serving

DIRECTIONS:
 

1. Preheat the oven to 375°F. Line a baking sheet with aluminum foil.
2. Arrange the bacon in an even layer on the baking sheet and sprinkle evenly with black pepper. Bake until evenly brown and crispy, 14 to 16 minutes. When the bacon is cool enough to handle, break each slice into 2 or 3 pieces.
3. While the bacon cooks, heat a large skillet over medium heat. Working in batches, add 2 or 3 tortillas to the pan and heat until lightly browned on each side, 1 minute per side. Repeat until all tortillas are toasted.
4. To serve, place 1 piece of lettuce, 1 or 2 pieces of tomato, 2 slices of avocado and 3 pieces of bacon on top of each tortilla.
5. Serve immediately, with limes for squeezing.

And there you have it...Enjoy!  Eat Well My Friends!

Saturday, September 1, 2018

Grilled Sticky Honey-Sriracha Drumsticks with Slaw


Here is a nice September Recipe for a late summer night...

It’s the Saturday night of Labor Day weekend, so it’s basically criminal NOT to light up the grill.


INGREDIENTS:

¾ cup plain Greek yogurt
3 tablespoons seasoned rice vinegar
1 small red cabbage, shredded
3 carrots, peeled and shredded
2 medium heads fennel, thinly sliced
1 bunch scallions, thinly sliced
Kosher salt and freshly ground black pepper
Drumsticks
2½ pounds chicken drumsticks
Kosher salt and freshly ground black pepper
2 tablespoons unsalted butter
¼ cup honey
⅓ cup sriracha
Juice of 1 lime
1 tablespoon garlic powder
1 tablespoon minced fresh minced ginger
Extra-virgin olive oil
Minced fresh chives, for garnishing
2 limes, cut into wedges

DIRECTIONS: 

1. MAKE THE SLAW: In a large bowl, whisk together the yogurt and vinegar. Add the cabbage, carrots, fennel and scallions; toss well to combine. Season with salt and pepper.
2. Cover the bowl and transfer to the refrigerator for 30 minutes to allow the flavors to meld.
3. MAKE THE DRUMSTICKS: Prepare your grill for high heat. Season the chicken with salt and pepper.
4. In a small saucepan, melt the butter over medium heat. Add the honey, sriracha, lime juice, garlic powder and ginger; simmer for 2 minutes.
5. Brush the grill grates with the olive oil. Grill the chicken, turning as needed, until charred and fully cooked, 15 to 20 minutes.
6. Brush the honey-sriracha sauce generously over the chicken and continue to grill, turning frequently, for 6 minutes more.
7. Garnish the chicken with chives and serve with the slaw and lime wedges.

 Enjoy this with a nice cool glass of Ice Tea...


 Enjoy!   Eat Well My Friends!

Thursday, August 30, 2018

Old Fashioned Carrot Cake

Here is an old recipe from believe it or not...The 70's ..That needs to come back!

INGREDIENTS:

  • 4 large eggs
  • 2 cups sugar
  • 1 cup canola oil
  • 2 cups all-purpose flour
  • 2 to 3 teaspoons ground cinnamon
  • 3/4 teaspoon baking soda
  • 1/2 teaspoon baking powder
  • 1/4 teaspoon salt
  • 1/4 teaspoon ground nutmeg
  •  2 cups grated carrots
FROSTING-
  • 1/2 cup butter, softened
  • 3 ounces cream cheese, softened
  • 1 teaspoon vanilla extract
  • 3-3/4 cups confectioners' sugar
  • 2 to 3 tablespoons 2% milk
  • 1 cup chopped walnuts, optional
  • Orange and green food coloring, optional
DIRECTIONS- 
  • In a large bowl, combine the eggs, sugar and oil. Combine the flour, cinnamon, baking soda, baking powder, salt and nutmeg; beat into egg mixture. Stir in carrots.
  • Pour into two greased and floured 9-in. round baking pans. Bake at 350° for 35-40 minutes or until a toothpick inserted in center comes out clean. Cool for 10 minutes before removing from pans to wire racks to cool completely.
  • For frosting, in another large bowl, cream butter and cream cheese until light and fluffy. Beat in vanilla. Gradually beat in confectioners' sugar. Add enough milk to achieve desired spreading consistency. Reserve 1/2 cup frosting for decorating if desired. If desired, stir walnuts into remaining frosting.
  • Spread frosting between layers and over top and sides of cake. If decorating the cake, tint 1/4 cup reserved frosting orange and 1/4 cup green. Cut a small hole in the corner of pastry or plastic bag; insert #7 round pastry tip. Fill the bag with orange frosting. Pipe twelve carrots on top of cake, so each slice will have a carrot. Using #67 leaf pastry tip and the green frosting, pipe a leaf at the top of each carrot.
  • Store cake in the refrigerator.
And there it is.....(Wait until after this heatwave to bake this...)Enjoy! Eat well my friends!

Friday, August 10, 2018

Berry Pie Tarts

Heyyyyyyyyyyyyyyy guys and gals..If you've ever wanted to eat pie like a cookie, these pie bar cookies are for you. The bright berry filling and buttery, flaky crust make them totally irresistible.

INGREDIENTS: 

Butter or nonstick vegetable oil spray (for pan)

1 batch Our Favorite Pie Dough, divided into 2 discs,

chilled All-purpose flour (for rolling)

3 cups mixed berries, preferably a mix of blueberries and hulled, quartered strawberries

1 cup blueberry preserves

3 tablespoons cornstarch

2 teaspoons fresh lemon juice

1/8 teaspoon kosher salt

1 large egg (optional)

2 teaspoons milk (optional)

1 teaspoon coarse sugar (optional)

Special Equipment 

An 8x8x2" baking pan (preferably metal)


DIRECTIONS:

Butter baking pan and line with parchment, leaving a 1" overhang on both long sides. Roll out 1 disc of dough on a lightly floured work surface to a 13" square. Roll dough loosely around rolling pin, then unfurl into baking pan. Gently lift and settle dough into bottom and up sides of pan. Trim any excess dough that extends past top lip of pan. Chill.

Roll out second disc to a 13" square. Transfer to parchment or a large cutting board. Using a ruler or straight edge, cut dough into 10 (1"-wide) strips for lattice, or use a round cookie cutter or glass to cut into circles. Chill both crusts while you prepare the filling.

Place racks in center and bottom of oven; preheat to 425°F. Place a rimmed baking sheet on bottom rack to preheat.

Bring berries, preserves, cornstarch, lemon juice, and salt to a simmer in a small saucepan over medium heat and cook, stirring frequently to avoid scorching, until berries are broken down and mixture has thickened, about 7 minutes. Transfer to a large heatproof bowl and chill 15 minutes.

 Pour cooled berry mixture evenly over bottom crust. Arrange strips in a lattice pattern or overlap circles on top. Fold excess dough from top lip of pan down over itself to create a border. Crimp slightly, if desired. Chill 15 minutes. Beat egg and milk in a small bowl, if using.

Brush top crust with egg wash and sprinkle with sugar, if using. Transfer baking pan to preheated baking sheet. Bake bar until crust begins to turn golden, about 25 minutes. Rotate sheet, move to center rack, and reduce oven temperature to 350°F. Continue baking, covering loosely with foil if crust gets too dark, until crust is golden brown and thickened juices are bubbling, 30–35 minutes more. Let cool completely on a wire rack. Lift bar out of pan using parchment overhang and cut into 16 squares.

Do Ahead

Bars can be made 3 days ahead; Store in an airtight container at room temperature.

ENJOY!  Eat well my friends!

Thursday, August 9, 2018

Banana Walnut Bread

Hey Folks...Here is an easy to fix Banana -Walnut Bread recipe that is actually good for you....You know how most things you love aren't...Well this is the exception...This is healthy, nourishing, and incredibly indulgent. Quick-cooking oats, tangy buttermilk, brown sugar, a double nutty dose of chopped walnuts and walnut oil, and course—bananas—take this moist banana bread to a whole new level.Check it out.

INGREDIENTS:


¾ cupOrganic Coconut Flour
¼ teaspoonBaking Soda
6 Eggs
¼ cupCoconut Oil
1 teaspoonVanilla Extract
½ teaspoonAlmond Extract
2 bananas ripe
¼ teaspoonground Cinnamon
¼ teaspoonNutmeg
1 cupChopped Walnuts
½ cupAlmond Flour
2 tablespoonsCoconut Oil
2 tablespoonsHoney
1 tablespoonground Cinnamon
½ cupChopped Walnuts (chopped)
DIRECTIONS:


Sift the flour, baking soda, and salt into a medium bowl, set aside. Whisk the eggs and vanilla together in a liquid measuring cup with a spout, set aside. Lightly brush a 9 by 5 by 3-inch loaf pan with butter. Preheat the oven to 350 degrees F.
In a standing mixer fitted with the paddle attachment or with an electric hand-held mixer, cream the butter and sugar until light and fluffy. Gradually pour the egg mixture into the butter while mixing until incorporated. Add the bananas (the mixture will appear to be curdled, so don't worry), and remove the bowl from the mixer.
With a rubber spatula, mix in the flour mixture until just incorporated. Fold in the nuts and transfer the batter to the prepared pan. Bake for 55 minutes or until a toothpick inserted into the center of the bread comes out clean. Cool the bread in the pan on a wire rack for 5 minutes. Turn the bread out of the pan and let cool completely on the rack. Wrap in plastic wrap. The banana bread is best if served the next day.

Don't Sweat The Technique- 

 Banana bread is easy to make-just a few simple steps-and irresistible to eat. I recommend making a few extra loaves, wrapping in plastic, and freezing. Thaw at room temperature for an hour and you'll have fresh banana bread ready to go by the time everyone wakes up. Freezing individual slices works well too.

Enjoy!  Eat Well My Friends!

Thursday, August 2, 2018

Apple Cabbage Salad


It's in the middle of Summer...It's hot...Sooooo maybe you don't feel like turning on that oven....

How about something light like a salad...But you don't want the traditional salad...

This one is for you!


INGREDIENTS:
  1. 1/2 head Savoy cabbage
  2. 1/2 head red cabbage
  3. 1 Fuji apple
  4. 1/4 red onion
  5. 1/2 cup walnuts, roughly chopped
  6. 1/2 cup golden raisins
For The Dressing-
  1. 2 tablespoons apple cider vinegar
  2. 1/8 teaspoon cayenne pepper
  3. 1/3 cup nonfat Greek yogurt
  4. 2 teaspoons agave nectar
  5. 1 teaspoon fennel seeds
  6. 1/2 teaspoon sea salt
 DIRECTIONS:
  1. Using a mandoline or sharp knife, thinly slice the cabbage, apple, and red onion to resemble extremely fine confetti; transfer to a large bowl.
  2. Add the walnuts and raisins. Toss gently to combine.
  3. In a small bowl, whisk together all the ingredients for the dressing.
  4. Top the salad with the dressing. Using salad tongs, mix until evenly dressed.
There you have it...Enjoy ! Eat Well My Friends!

Wednesday, August 1, 2018

Yakisoba Noodles

I was introduced to this dish when I was a cook in the U.S. Air Force...Stationed in Japan, Okinawa, to be exact...

I've loved it ever since...I don't know if this is a Japanese dish or not...(I was in a Restaurant run by Americans..Ex-Servicemen who specialized in "Pan Asian "Cusine..I'll give them the benefit of the doubt.)

It is Japanese...If you’ve never had stir-fried Japanese yakisoba noodles before, I urge you to invite them into your work week rotation. They are fast, highly-adaptable, and couldn’t love summer’s bounty any more. In Candice Kumai’s Kintsugi Wellness, the cookbook author and wellness writer shares her nostalgic recipe for Light Yakisoba Noodles.

Here, I used a mixture of shiitake mushroom, kale, onion, and garlic to befriend the fresh yakisoba noodles, but you could easily swap in any number of vegetables to suit your taste (cabbage, carrot, scallions, and bean sprouts are traditionally used), as well as adding in some cut-up chicken, pork, shrimp, or tofu if you fancy a protein.
This easy-to-make (and easier-to-love!) yakisoba hits all the right notes, and scales up readily for a larger group. Throw it together on any given busy weeknight, with plenty of time to let you sit back and soak up the last of the evening's pinky orange-hued suns.

INGREDIENTS:
  • 2 tablespoons toasted sesame oil
  • 1/2 yellow onion, finely diced
  • 2 garlic cloves, minced
  • 2 cups thinly sliced shiitake mushroom caps
  • 3 cups fresh yakisoba noodles (look for these at the Japanese market)
  • 2 cups finely chopped kale
  • 1 1/2 teaspoons toasted sesame seeds
  • Light yakisoba sauce
  • 2 tablespoons reduced-sodium tamari soy sauce
  • 3 tablespoons rice vinegar
  • 1 tablespoon tomato paste (or try sriracha)
  • 1/4 cup vegan Worcestershire sauce
  • 1/4 cup purified water
DIRECTIONS:
  1. In a medium sauté pan warm the oil over medium heat. Add the onion and sauté for 5 minutes, stirring occasionally. Add the garlic and sauté for 2 minutes, until fragrant. Add the mushrooms and sauté for 2 to 3 minutes more, stirring well.
  2. Add all the ingredients for the light yakisoba sauce to the pan and stir. Add the fresh yakisoba noodles and sauté for a few minutes, tossing to coat all the noodles with the sauce, and cook until the water evaporates.
  3. Add the chopped kale and toss to slightly wilt and coat with the sauce. Divide the noodles among individual serving bowls and top with 1⁄2 teaspoon of sesame seeds per bowl. 
There you have it....Enjoy...Eat and Drink Well My friends... Special thanks to Candice Kumai  for this great recipe!

Tuesday, July 24, 2018

Ground Meat Ragu

Here is a nice easy meal for those nights like this when you don't feel like really cooking.

Serves: 6 to 8
Prep time: 15 min
Cook time: 4 hrs 30 min

INGREDIENTS:

  • 2 garlic cloves
  • 1 small Spanish onion,15 peeled and chopped
  • 2 carrots, peeled and chopped
  • 2 celery stalks, peeled and chopped
  • 1/2 bunch flat-leaf Italian parsley
  • 2 sprigs rosemary, sage, thyme, or a combination
  • 3 tablespoons extra-virgin olive oil
  • 4 pounds mixed ground meat, such as 2 pounds beef, 1 pound pork, and 1 pound veal
  • 1 tablespoon Italian double concentrate tomato paste
  • 1 35-ounce can San Marzano tomatoes
  • 1 pinch salt and pepper, to taste
DIRECTIONS:
  1. Chop the garlic, onions, carrots, celery, herbs, and parsley finely in a food processor.
  2. In a large heavy-bottomed Dutch oven-type pan, sweat the vegetables out over low heat in the olive oil with a pinch of salt.
  3. Let them sweat about 7 to 8 minutes, until the onions become translucent but are not taking on color. Add about 3/4 cup water and the tablespoon of tomato concentrate and let cook down briskly until the liquid is almost completely evaporated.
  4. Now add the ground meat, breaking it up continuously and moving it about so that no lumps or balls form and all the meat gets broken down into its individual strands. Once the meat is all broken down and just cooked, add the can of San Marzano tomatoes and cook, simmering gently, stirring occasionally on the lowest heat you can go. The longer and slower this cooks, the better the ragu. We're talking 3 or 4 hours. You will know it's done when all the fat has cooked out of the meat and floats lazily on top of the sauce, colored orange from the tomato. At this point, the ragu can be eaten immediately or refrigerated for 3 to 4 days or frozen for 3 to 4 months.
Have with a nice glass of wine..

There it is...Not too complex...Enjoy! Eat and drink well my friends..

Food Safety Tips
Protect yourself against food-borne illnesses.


1. Use a "refrigerator thermometer" to keep your food stored at a safe temperature (below 40 degrees fahrenheit).

Cold temperatures slow the growth of bacteria. Ensuring that your refrigerator temperature stays at 40 degrees Fahrenheit or colder is one of the most effective ways to reduce your risk of food-borne illness. You can buy a refrigerator/freezer thermometer at appliance stories, home centers (i.e. Home Depot), and kitchen stores including online ones, such as Cooking.com.

2. Defrost food in the refrigerator, the microwave, or in cold water... never on the counter!

Perishable foods should never be thawed on the counter for longer than two hours because, while the center of the food may remain frozen, the outer surface may enter the Danger Zone, the range of temperatures between 40 and 140 degrees fahrenheit, in which bacteria multiply rapidly. If you’re short on time, use the microwave or you can thaw meat and poultry in airtight packaging in cold water. Change the water every half-hour so it stays cold and use the thawed food immediately.

3. Always use separate cutting boards for raw meat/poultry/fish and cooked foods/fresh produce.

Bacteria from uncooked meat, poultry, and fish can contaminate cooked foods and fresh produce. An important way to reduce this risk is to use separate cutting boards for raw meat/poultry/ fish, and cooked foods/fresh produce.

4. Always cook meat to proper temperatures, using a calibrated instant-read thermometer to make sure.

One effective way to prevent illness is to use a food thermometer to check the internal temperature of meat, poultry, and egg dishes. The USDA Recommended Safe Minimum Internal Temperatures are as follows:

* Beef, veal, and lamb (steaks and roasts), fish - 145 degrees fahrenheit

* Pork and ground beef - 160 degrees fahrenheit

* Poultry - 165 degrees fahrenheit.

Cook meats like roasts and steaks to lower temperatures, closer to medium-rare, so that they retain their moisture. It is recommended that those who are at high risk for developing food-borne illness (i.e. pregnant women and their unborn babies, newborns, young children, older adults, people with weakened immune systems, or certain chronic illnesses) should follow the USDA guidelines.

5. Avoid unpasteurized/raw milk and cheeses made from unpasteurized milk that are aged less than 60 days.

Raw milk is milk from cows, sheep, or goats that has not been pasteurized (heated to a very high temperature for a specific length of time) to kill harmful bacteria that may be present. These bacteria, which include salmonella, E. coli and listeria, can cause serious illness and sometimes even death. The bacteria in raw milk can be especially dangerous to pregnant women, children, the elderly, and people with weakened immune systems or chronic illnesses. Raw milk cheeses aged 60 days or longer are okay, since the salt and acidity of the cheese-making process make for a hostile environment to pathogens.

6. Never eat "runny" eggs or foods, such as cookie dough, that contain raw eggs.

Even eggs that have clean, intact shells may be contaminated with salmonella, so it’s important to cook eggs thoroughly until both the yolk and the white are firm. Casseroles and other dishes containing eggs should be cooked to 160 degrees fahrenheit and you can use an instant-read food thermometer to check. Eggs should always be cooked fully and those who are at high risk for developing foodborne illness (pregnant women and their unborn babies, newborns, young children, older adults, and people with weakened immune systems or certain chronic illnesses should follow the USDA guidelines. If you can’t resist runny eggs or sampling cookie batter, use pasteurized eggs. They’re found near other eggs in large supermarkets.

7. Always wash your hands in warm soapy water for at least 20 seconds before handling food and after touching raw meat, poultry, or eggs.

You can pick up a lot of bacteria out in the world, so it’s important to always wash your hands before you eat or prepare food. You should also wash your hands after touching any uncooked meat, poultry, fish, or eggs, as the bacteria from these foods can contaminate cooked foods and fresh produce. Use soap and warm water and wash thoroughly for at least 20 seconds.

8. Always heat leftover foods to 165 degrees fahrenheit.

The USDA recommends heating all cooked leftovers to 165 degrees fahrenheit in order to kill all potentially dangerous bacteria.

9. Never eat meat, poultry, eggs, or sliced fresh fruits and vegetables that have been left out for more than two hours or more than one hour in temperatures hotter than 90 degrees Fahrenheit.

If you leave perishable foods out of the refrigerator or freezer for more than two hours they may enter the Danger Zone—the unsafe temperatures between 40 and 140 degrees Fahrenheit, in which bacteria multiply rapidly.

10. Whenever there’s a food recall, check products stored at home to make sure they are safe.

You should discard any food that’s been recalled because it’s associated with the outbreak of a food-borne illness. But, according to a survey conducted by Rutgers University during the fall of 2008, only about 60% of Americans search their homes for foods that have been recalled because of contamination. For more information on food recalls, visit the website Recalls.gov


Cavier & Vodka
Courtesy of The Lady (Bug) of the Household